TRAINING - vyvirtualclass
- How can I see my Overall view(Student Page)
- How can I know what is my next step(Reminders)
- How can I join the online classes(Join Classroom)
- How can I Check my attendance(Attendance)
- How can I access Digital course library(Files/links)
- How can I catch up the class when I was absent for the classes(Recordings)
- How can I use the system when no class are running(Study material)
- How can I login GVC
- How can I check my teams assigned
- How can I authorize zoom
- How to create Quick Meeting
- How to schedule meeting using zoom
- How can I add the course content while scheduling the meetings
- Recording the scheduled meeting.
- How can I check the participants of the meeting
- How can I check the duration of the student participated in the meeting
- How can I export the attendance
- How can I check the students information of each teams
- How can I check other faculties of my teams
Onboard, Deliver and operate GVC for all your classroom Activities.
Workshop to launch GVC for organization.
GVC Supporting unique workstyle for all education platform users such as Administration, Faculty and students.
Student
- Access GVC on all your devices' websites, android and IOS devices.
- Know your assigned teams.
- Know your schedules wherever and whenever using GVC android and IOS mobile apps.
- Get alert or notified about your classes.
- Single click join the running virtual class.
- Get automated attendance.
- Prepare course content well before the class starts.
- Catch up classes, if you missed your virtual classes due to any technical and non technical issues.
- All Zoom integrated virtual classes feature like chat, screen share, group chat etc.
- Assignments integration in GVC.
- Online test & Quiz to improve student performance.
- Automated results after immediate submission of the test.
- Online assignment and project presentation.
- Day by day home work submissions.
- Online feedback of faculty to students on their assignment and homework submissions.
- Performance report on assessment.
- and much more....
As a student, what can I get from GVC?
- All classroom activities in well organized way
- Know all the schedules classes well before the class starts
- With a single click join the class
- Students can know well before on what topic the class is scheduled.
- Download the Course content related to that particular class
- Check attendance
- Alert notification of the running class
- Catch up classes which are missed for any reason(technical/non technical).
- Online test and quiz to improve performance
- Submitting Homework and Assignments digitally.
- Immediate test results, no need to wait for weeks to get the results.
- Revise the topics any number of times to improve the performance using the digital course library.
Welcome to GVC Schedules
GVC Schedules helps faculty and students to stay organized in conducting the virtual classes. Education platform follows the time table for the classroom.
-
Prerequisite
- Students are on boarded
- Gets credentials via email or sms
- Students added to respective teams.
- Faculty schedules the classes for teams.
-
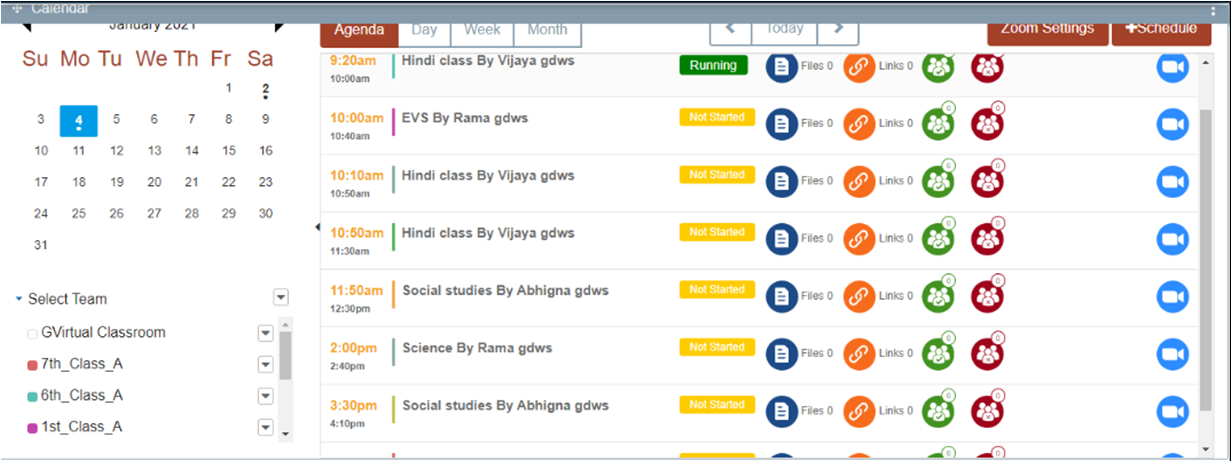
Student can see the progress on their page related to
- Students are launched to the schedule page
- Students can see all the teams he/she belongs
- Can see all the teams assigned
- The date and time , which team which faculty is going to take the class
- On what topic the class is going to be taken.
-
-
Prerequisite
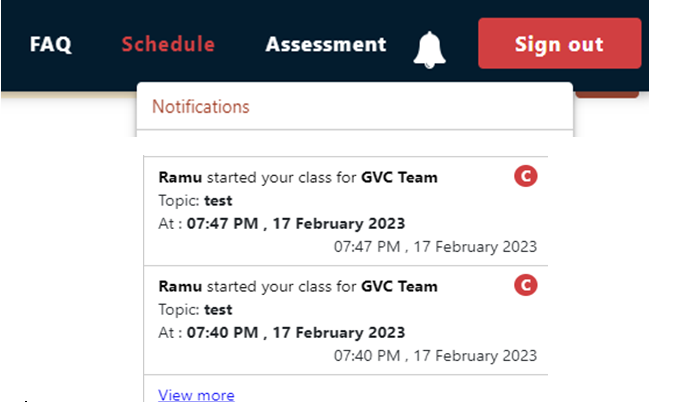
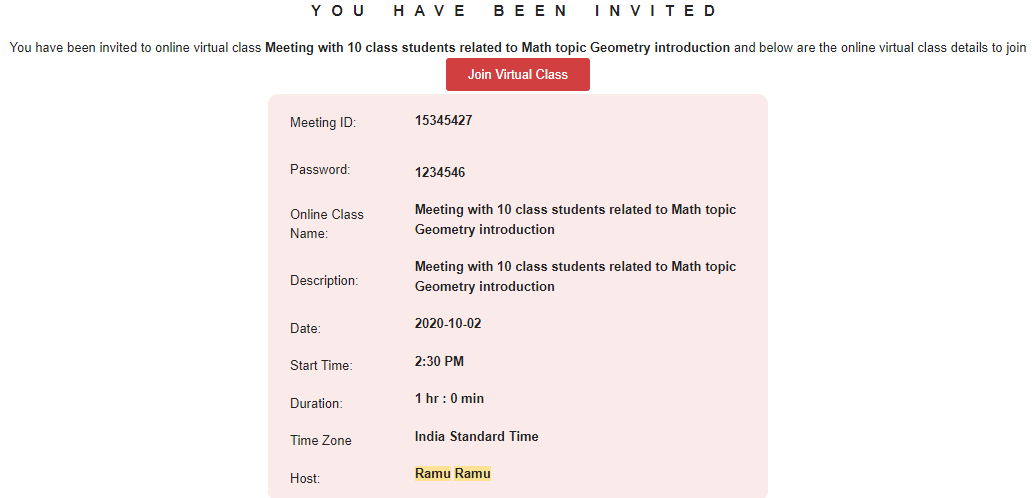
- There are 2 types of notifications one through the email and other within the application.
- Faculty need to check the notification and reminder option while scheduling a meeting.
-
Steps:
- As the Student logins the system gives notification about the class which is upcoming.
- Gets email notification of the class scheduled.
- As soon as class starts. gets notification about the class started.
-
-
Prerequisite
- Student gets an email from the administration regarding the credentials.
- Using the credentials student login into the system/website
- As soon as the login student can see the classes scheduled for him/her on the calendar (Can see his agenda/ whole day scheduled/Week/Month).
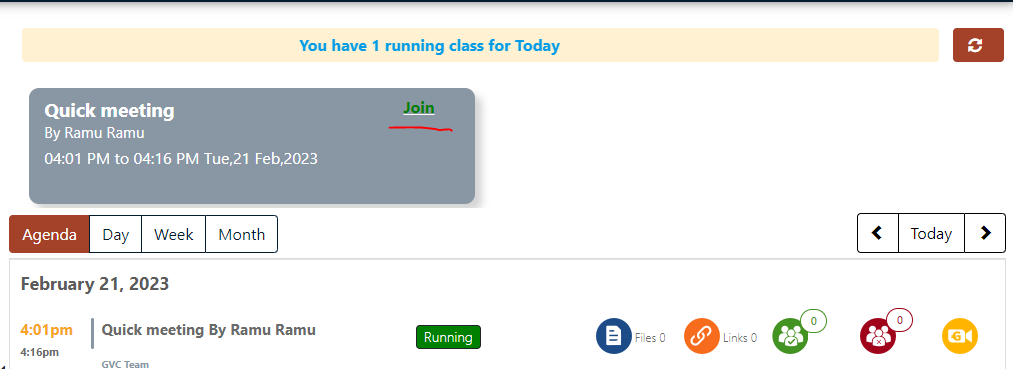
- Students looking at the calendar can join the class directly according to the scheduled time in the RUNNING class.
-
Steps:
- Login with student credentials in website/App
- launches to the schedule page
- Views all the schedule class on agenda
- If any class in ongoing
- Can see a join option Click on join to enter into the meeting
-
-
Prerequisite
- Faculty schedules the class, starts and completes the online class.
- Student should join the running class.
-
Steps:
- Go to the schedule page.
- For the completed class.
- Click on the “‘present user icon” beside the completed class.
- Can see the list of all students who attend the class.

-
-
Prerequisite
- Faculty should attach files and links while scheduling the class.
-
Steps:
- Login into the website as a student.
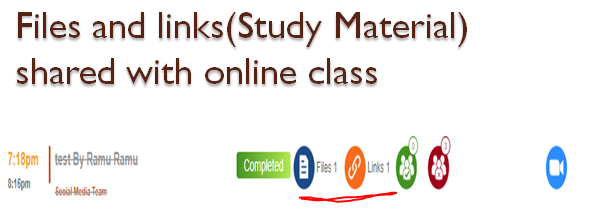
- At the each scheduled classes at files and links icons.
- Click on files and download.
- Click on links icon to navigate to the links provided by faculty.
-
-
Prerequisite
- Faculty while scheduling the class should check the option to record the online class.
-
Steps:
- Login into the website as a student.
- For the completed class
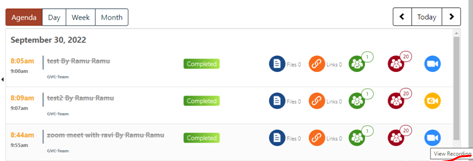
- Find the meeting provider icon.
- Click on the icon if faculty records the class
- Students can download the recording by clicking on the icon. OR
- At the teams click the arrow and select View recording Can see all the recording at one place
-
-
Prerequisite
- Faculty while scheduling the class provides files and links to that topic.
- Faculty should record the running class.
-
Steps:
- Students while class is not running.
- Login to the website as student
- Go to the completed class
- Click on files and links and go through the content shared by faculty on the respective topic
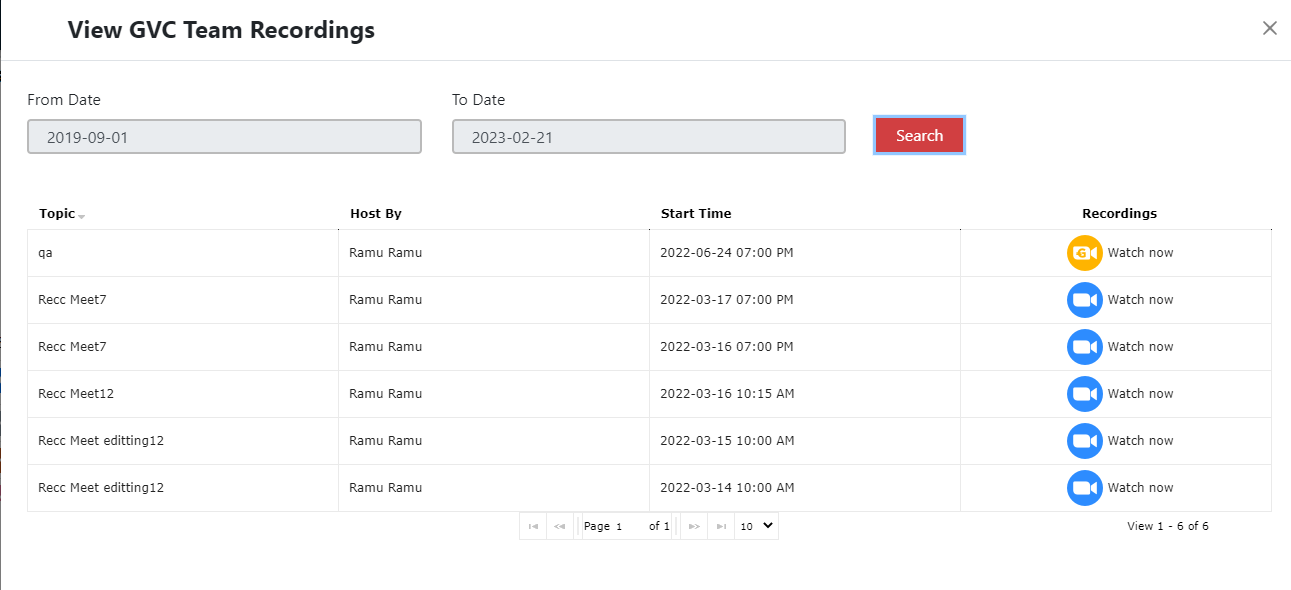
- Students can find the recordings of each topic for the completed class and can go through the same class how many times they wanted to revise. OR
- Go to teams and click on arrow, select the view recordings option All the recordings can be seen at one place based on topic
-
Upcoming
-
Prerequisite
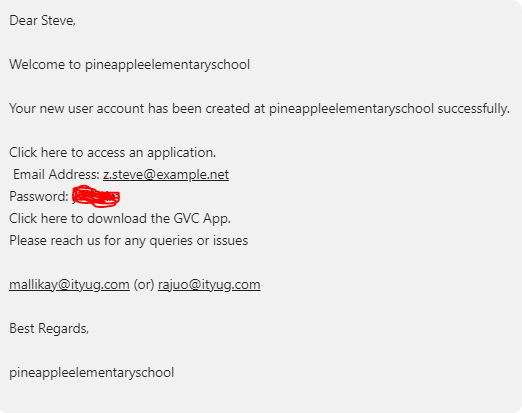
- Account creation email or sms will come to the provided email or phone number once Administration on boards.
-
Steps:
- Check Email/SMS sent by Administration
- Click the link provided in the email/SMS
- User will be launched to the website home page or if auto login exists you will be launched to the schedule page
- If launched to home page
- Click on sign In
- Enter the credentials shared in the Email/SMS
- Users will be launched to the schedule page.

-
-
Prerequisite
- Account creation email or sms will come to the provided email or phone number once Administration on boards.
- Administration will assign the respective teams to users
- Login into the website using credentials
- Launched to schedule page
-
Steps:
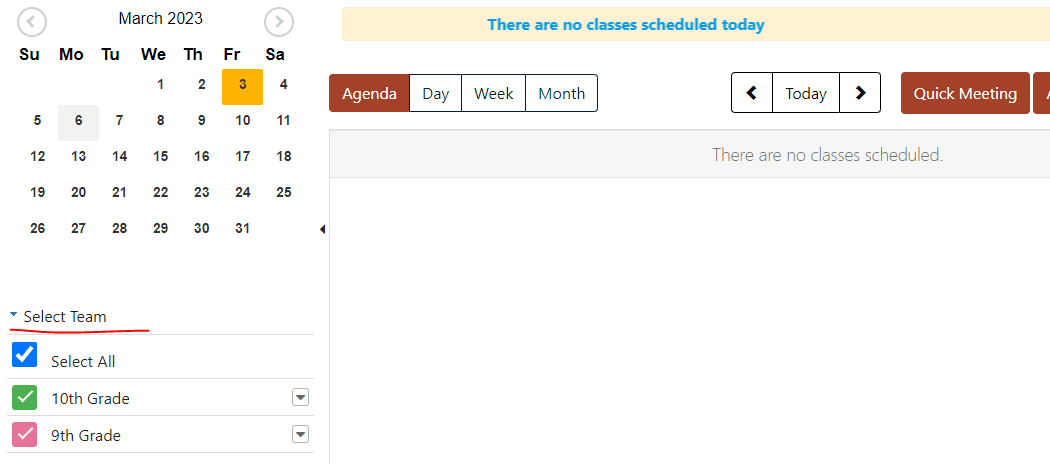
- In schedule page
- All the assigned Teams are shown below the calendar.
-
-
Prerequisite
- Account creation email or sms will come to the provided email or phone number once Administration on boards.
- Administration will assign the respective teams to users
- Login into the website using credentials
- Launched to schedule page
-
Steps:
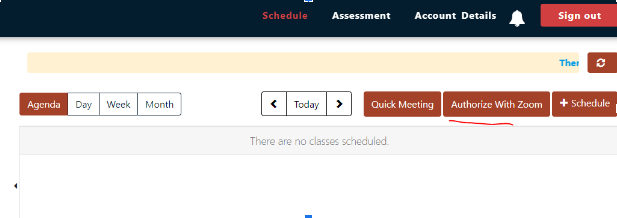
- Click on Authorize with zoom beside Quick Meeting
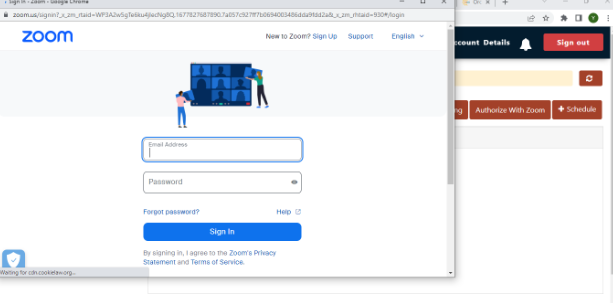
- Zoom login page will be opened
- Enter your valid zoom credentials
- Once logged in zoom
- User will be navigated to the schedule page with authorization complete
- If you want to check the zoom authorization details
- Click on zoom settings beside the quick meeting
- User can see the zoom account authorized


-
-
Prerequisite
- Account creation email or sms will come to the provided email or phone number once Administration on boards.
- Administration will assign the respective teams to users
- Login into the website using credentials
- Launched to schedule page
-
Steps:
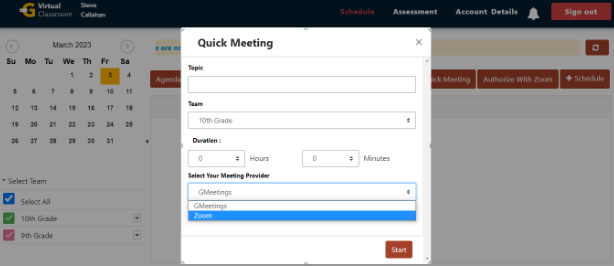
- Click on Quick meeting in the schedule page
- Opens the Quick meeting pop up
- Enter the required details
- Click on Start.
- Meeting gets started immediately.

-
-
Prerequisite
- Account creation email or sms will come to the provided email or phone number once Administration on boards.
- Administration will assign the respective teams to users
- Login into the website using credentials
- Launched to schedule page
-
Steps:
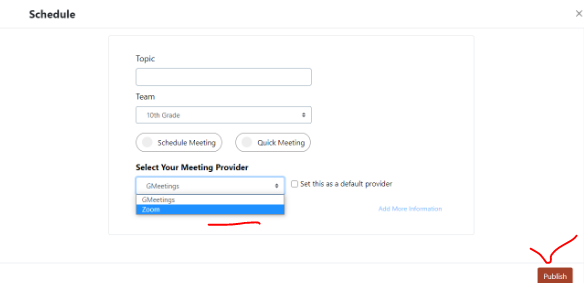
- Click on Schedule meeting in the schedule page
- Pop up appears
- Enter the details of the meeting
- Select meeting provider as zoom
- Click on publish
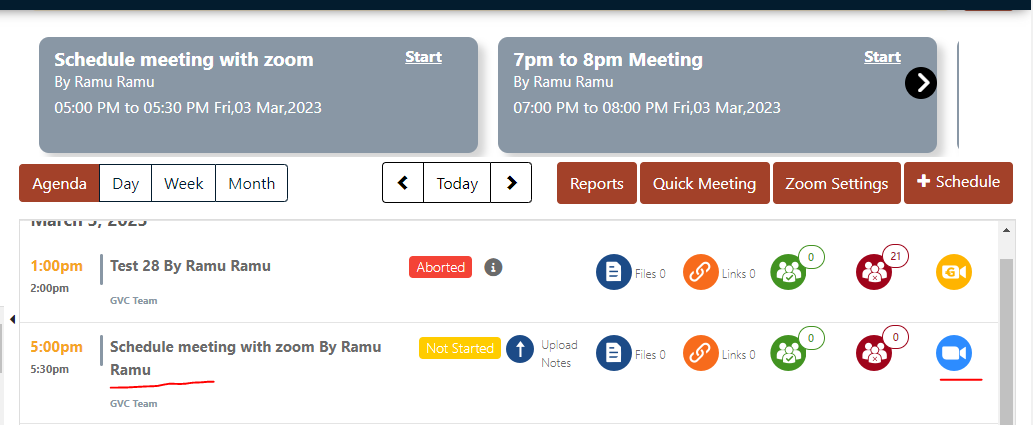
- Once meeting published
- Success message appears
- You can schedule the next meeting or close the pop up.
- As soon as you close the pop up
- You can see the schedule meeting with zoom

-
-
Prerequisite
- Account creation email or SMS will come to the provided email or phone number once Administration on boards.
- Administration will assign the respective teams to users
- Login into the website using credentials
- Launched to schedule page
-
Steps:
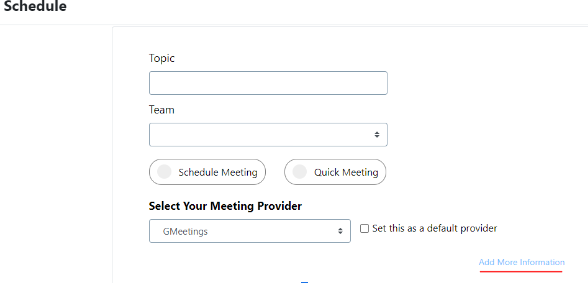
- Click on Schedule in the schedule page
- Pop up appears
- Enter the details of the meeting
- Select meeting provider as zoom
- Click on add more information
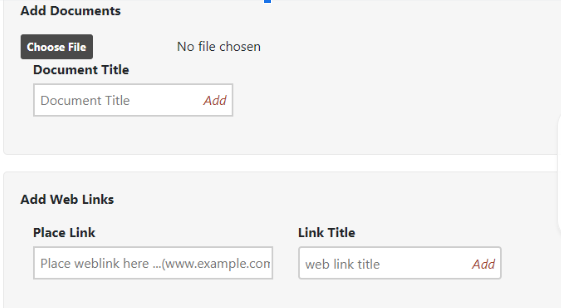
- In the add documents and add web links
- Upload the course content and add the web links related to the topic which is scheduled.
- This uploaded course content is available to the students in the scheduled meeting as files and links.
- After uploading click on publish.
- Now you can see the scheduled meeting in the schedule page. Associated with files and web links uploaded.
-
-
Prerequisite
- Account creation email or sms will come to the provided email or phone number once Administration on boards.
- Administration will assign the respective teams to users
- Login into the website using credentials
- Launched to schedule page
-
Steps:
- Create one scheduled meeting
- Start the meeting.
- Once the meeting is completed
- Click on icon beside the completed class
- Which shows the count of participants attended/not attended in the meeting


-
-
Log in with your Faculty credentials
-
Steps:
- Set up a scheduled meeting or a quick meeting
- As per the schedule, start the meeting
- After the meeting is over, click the "green color" icon beside "completed" icon
- The completed class information will appear in a pop-up window. It will show the attendees and their participation duration.


-
-
Log in with your Faculty credentials
-
Steps:
- Set up a scheduled meeting or a quick meeting
- As per the schedule, start the meeting
- After the meeting is over, click the completed icon next to the scheduled class.
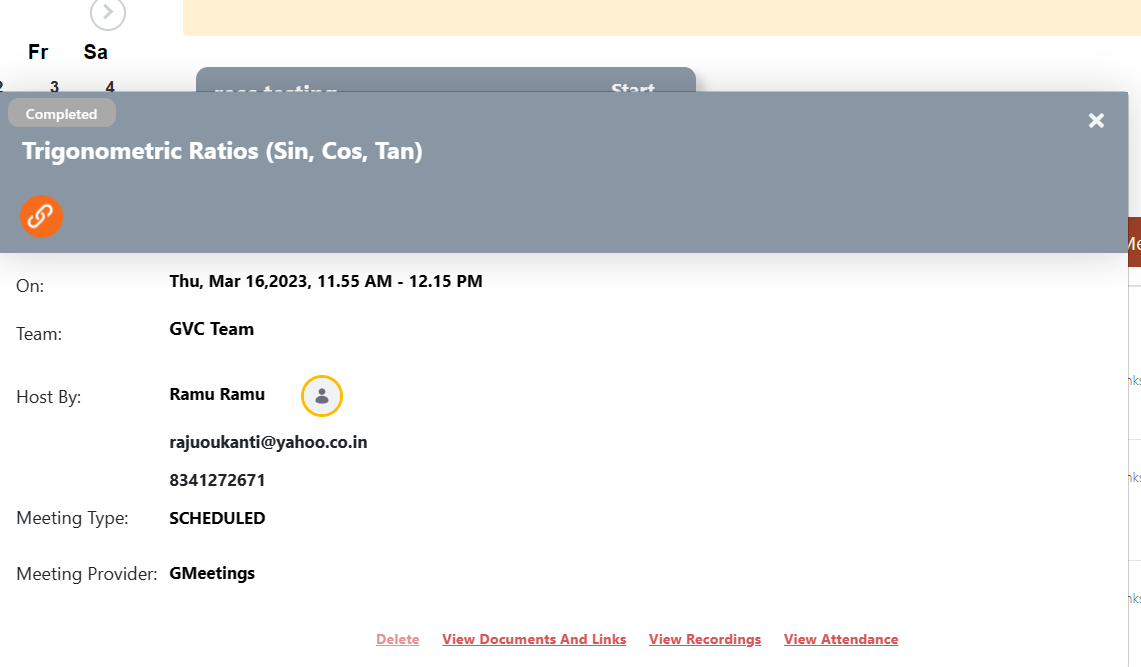
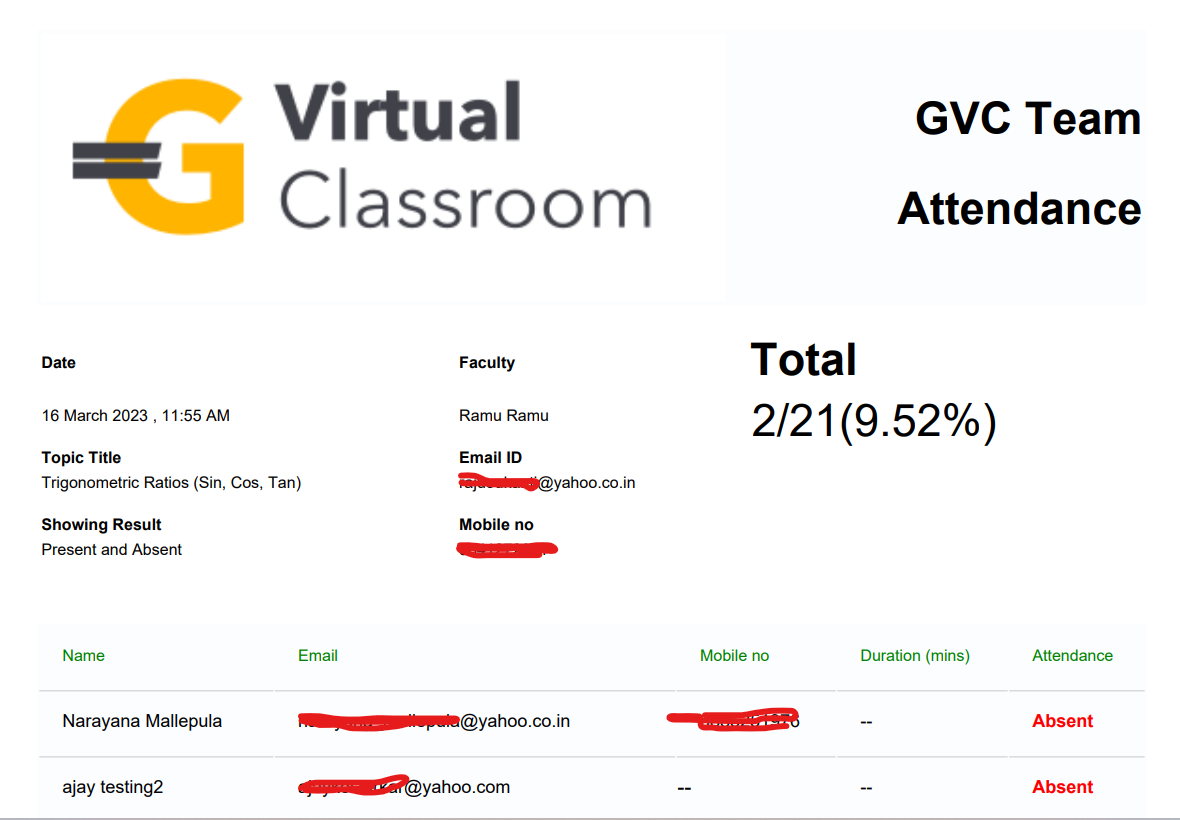
- You will see information about that particular completed class in a pop-up window. Click on "view attendance" from those details.
- Click on the icons provided to export the data in pdf or excel formats


-
-
Log in with your Faculty credentials
-
Steps:
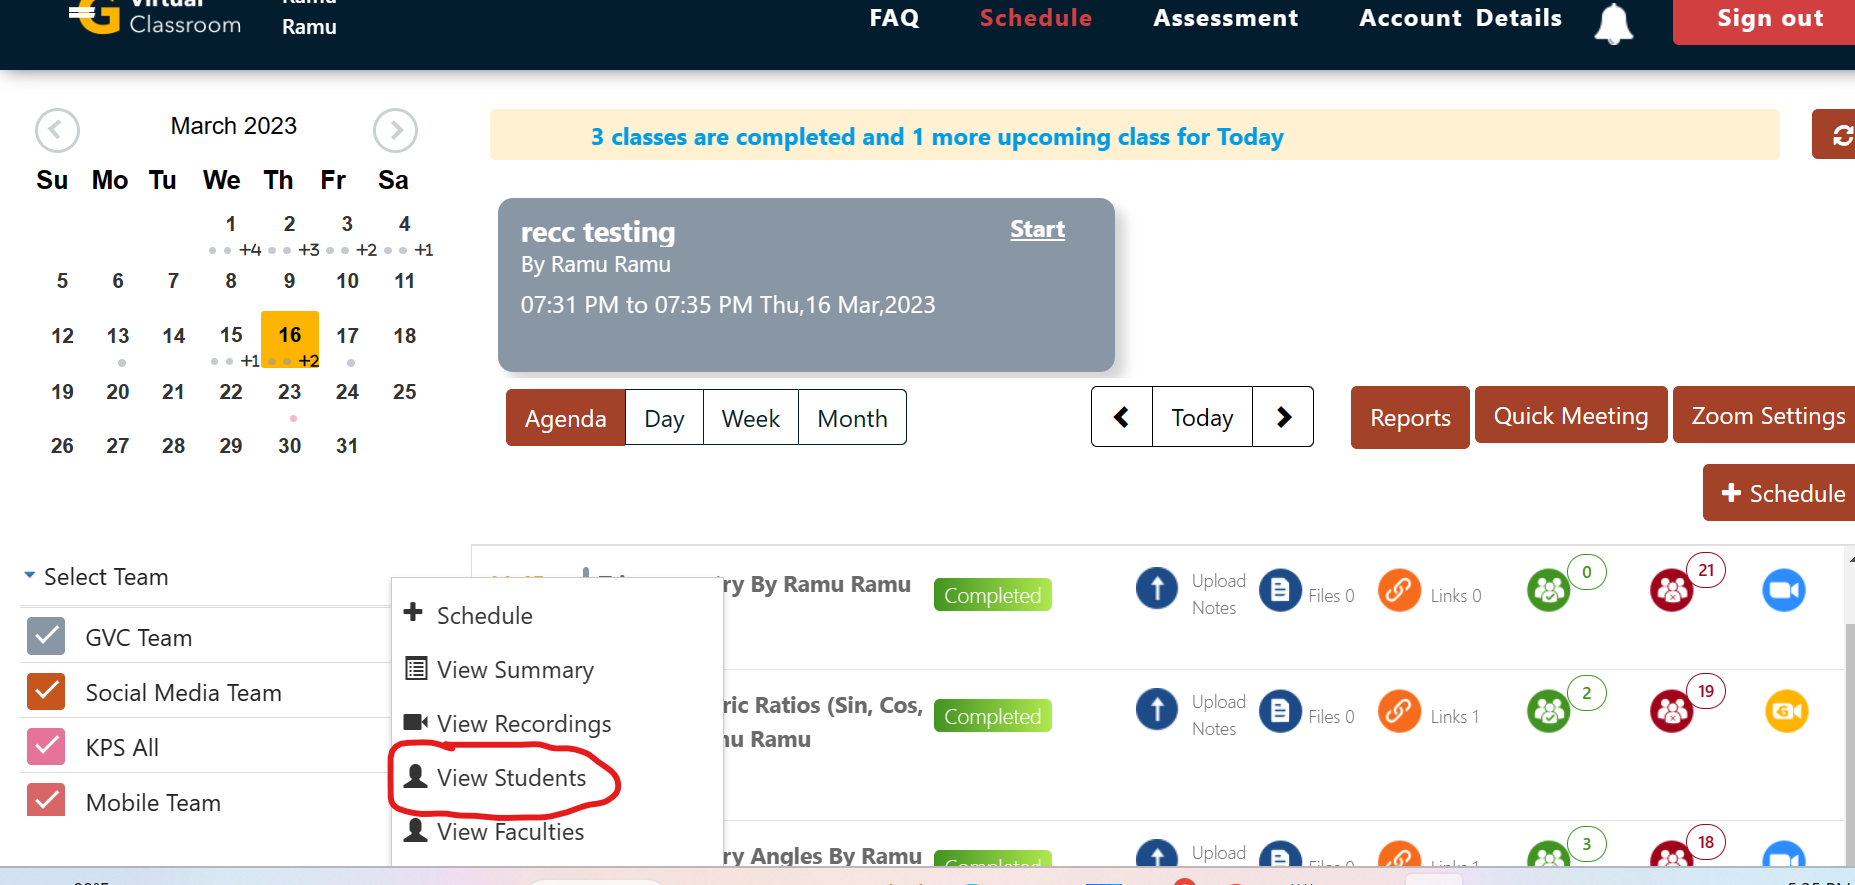
- Under the calendar on the dashboard page, you will find "select team"
- By clicking on the drop-down arrow next to the team name, you can access that team's information
- Click on "View Students", a pop-up window will show you the details of the students associated with that team


-
-
Log in with your Faculty credentials
-
Steps:
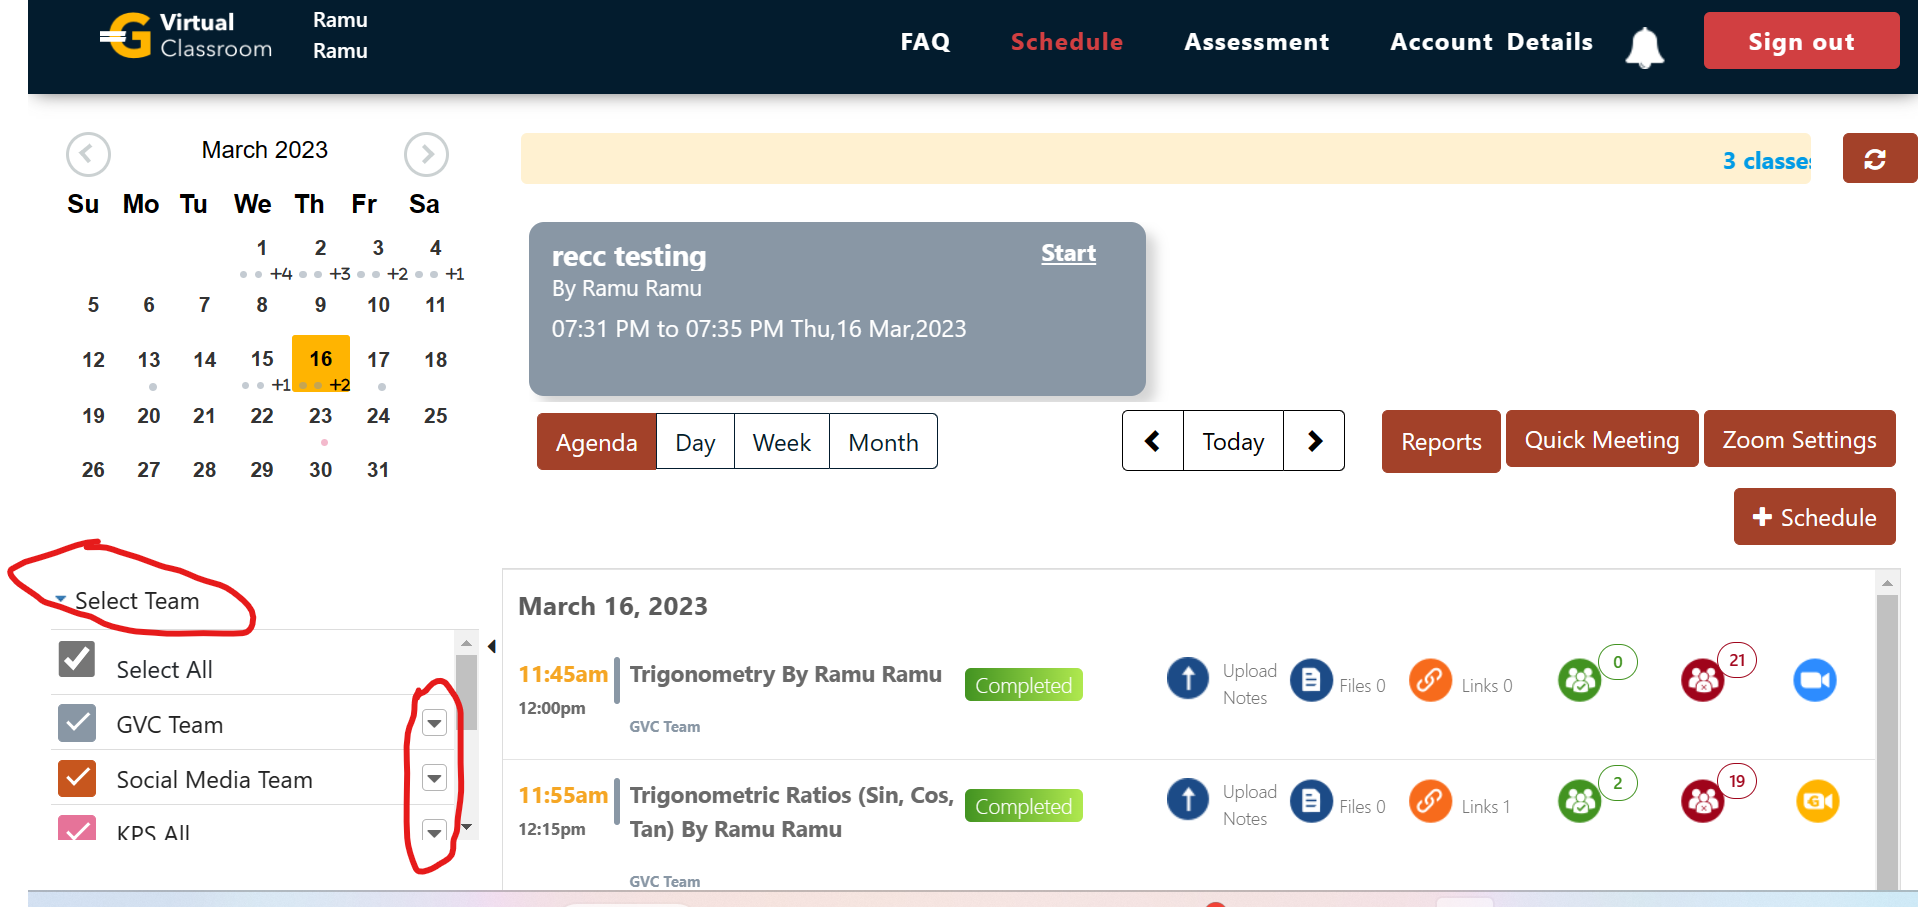
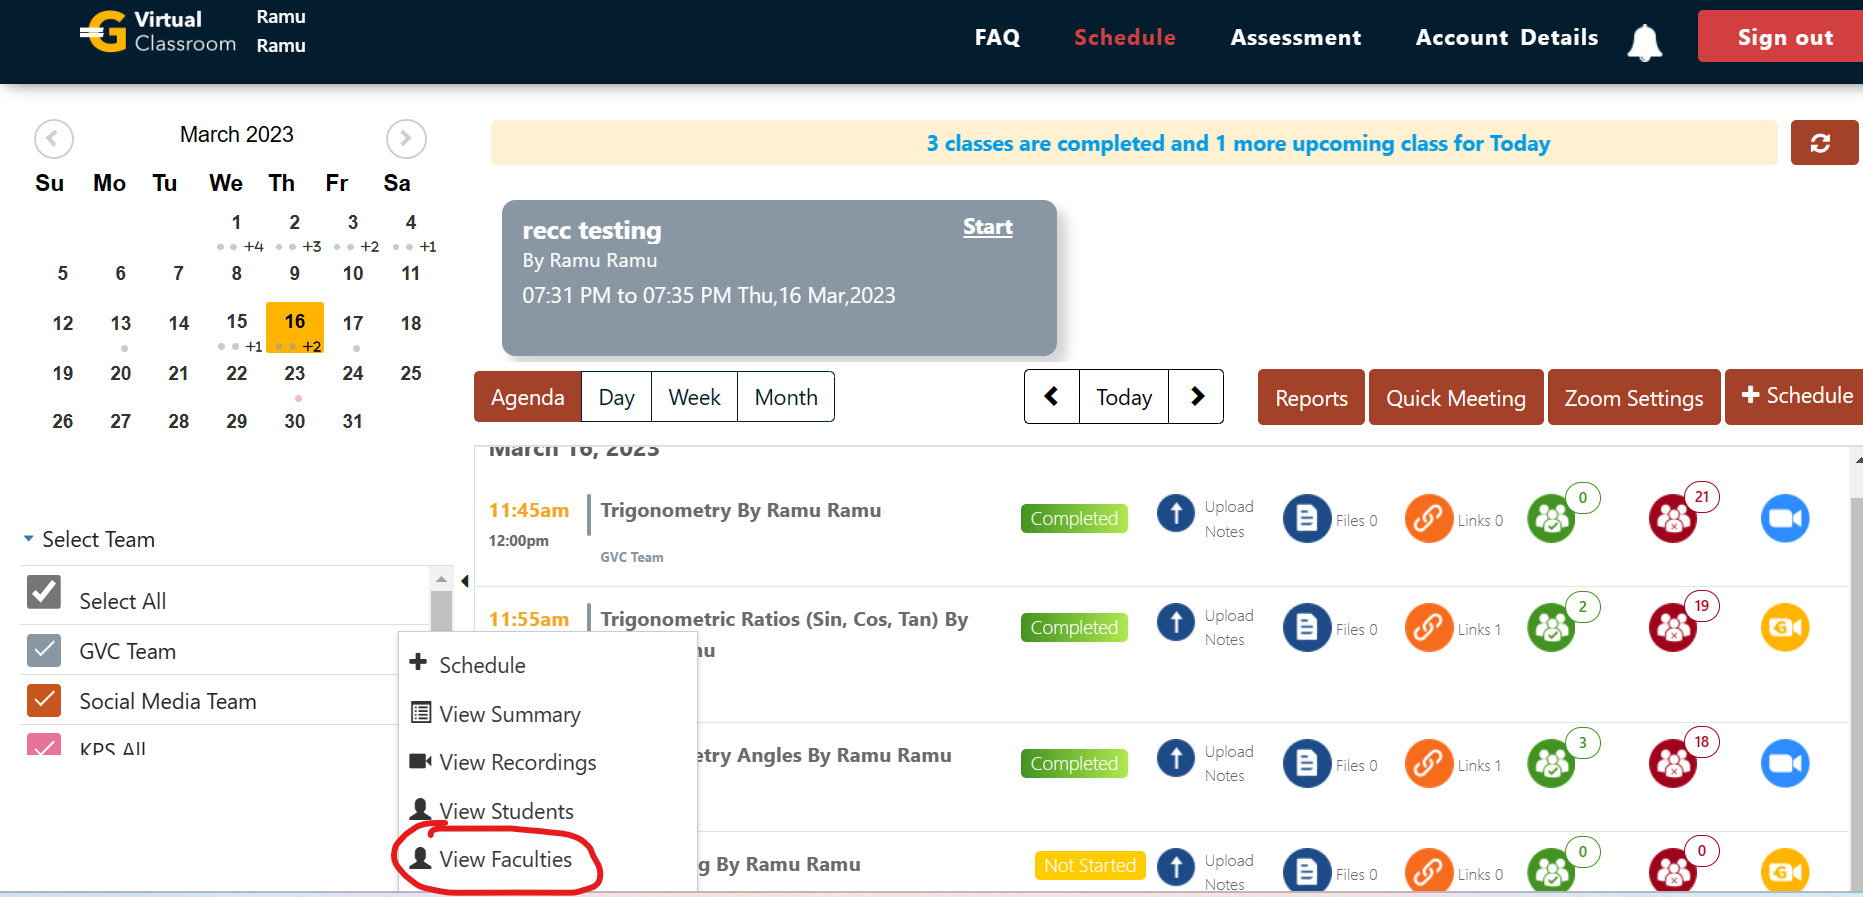
- Under the calendar on the dashboard page, you will find "select team"
- By clicking on the drop-down arrow next to the team name, you can access that team's information
- Click on "View Faculties", a pop-up window will show you the details of the faculties associated with that team

-
